We show you CPU-Z screenshots of the processors that we have installed, loaded, and turned on. Let’s zoom in on these screenshots and see the details. The CPU-Z screenshots confirm that everything is working fine. The processors are fitted correctly and ready to do their jobs effectively. The screenshots show that the processors have the required resources and are fully functional.If interested, you can download CPU-Z here

Power Consumption
The energy consumption of the entire PC, including its motherboard, processor, graphics card, memory, and SSD, is displayed. The specific amount of energy used will vary depending on the motherboard’s additional ICs, controllers, Wi-Fi, and Bluetooth, as well as the PSU’s efficiency. It should be noted that our measurement covers the entire PC and not just the processor’s power usage. Adding optical drives, HDDs, and sound cards to your average PC may cause the energy consumption to deviate from our reported numbers. Additionally, the inclusion of RGB components such as a lit motherboard, keyboard, liquid cooler, and mouse can add between 10 and 15 Watts to the power consumption.
We remind you that power consumption measurements may change based on different PCs and their setups. The power usage of parts like the audio controller, 3rd party chips, network controllers, extra SATA controllers, extra USB controllers, and other chips on the motherboard should also be taken into account. Therefore, the results are not absolute but relative. Also, the CPU cores are pushed to 100%, which means maximum power consumption. We remind you that the average power consumption is much lower.
Temperatures
We do not compare temperature data because we need to use the same cooling on all platforms. Also, the coolers (RPM) can react differently to TDP and settings in the motherboard BIOS. So, we do a temperature stress test instead.
We chose to use a heatpipe cooler because of the lower TDP. It worked well as the CPU temperature did not go over 80 degrees Celsius during heavy use.
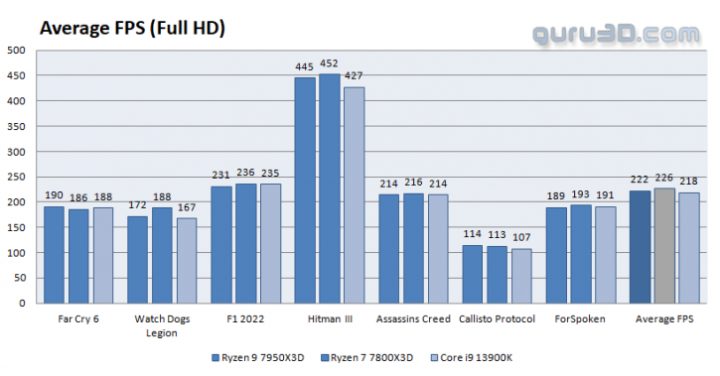
We are ready to start the benchmark part of this article, but first, let me show you our test system and the software we used.
Mainboard and processor
MSI X670E Tomahawk
AMD Ryzen 7 7800X3D
Graphics Cards
GeForce RTX 4090 (founder edition)
Memory
2×16 GB DDR5 6000 MHz (G.Skill Trident Z5)
Power Supply Unit
1200 Watt Platinum Certified Corsair AX1200i
Monitor
Dell 3007WFP – QHD up to 2560×1600
ASUS PQ321 native 4K UHD Monitor at 3840 x 2160
OS related Software
Windows 11 64-bit (latest patches & updates installed)
DirectX 9/10/11/12 latest End-User Runtime
Nvidia GeForce driver (latest WHQL)
A Word About “FPS”
What do we want in gaming, performance-wise? First of all, obviously Guru3D thinks that all games should be played at the best image quality (IQ) possible. But there’s a problem, IQ often affects the performance of a graphics card. We measure this in FPS, the number of frames a graphics card can show per second, the higher it is the more smooth your game will look.
A game’s frames per second (FPS) is a calculated average of a series of tests. That test is usually a time demo, a recorded part of the game that is the same as the actual game and its gameplay experience. After setting the same image quality settings; this time-demo is then used for all graphics cards so that the actual measuring is as fair as can be.
Frames per second Gameplay
<30 FPS very limited gameplay
30-40 FPS average but very playable
40-60 FPS good gameplay
When it comes to gaming, adjusting your monitor’s brightness and contrast levels is a crucial step. However, it has come to our attention that many of you may have incorrectly set up your monitors. This is evident from the occasional emails we receive from readers who are unable to differentiate between the colors in our benchmark charts in reviews. In such instances, it becomes apparent that the monitor is not set up correctly.
When analyzing the graph above, what should you be on the lookout for?
The top bar is a straightforward test pattern that includes 255 evenly spaced brightness levels and no embedded profile. If your monitor is configured correctly, you should be able to distinguish every step, and each step should have the same visually distinct difference from its adjacent steps. The contrast difference between the steps at the dark end of the bar should be similar to the contrast difference at the light end of the bar. Additionally, the first step must be completely black.
The three lower blocks are as follows: The far left block is a black square containing a tiny box that is slightly darker than black. The middle block is a square with lines and a central gray square. The far right block is a white square containing a small “gray” square that should barely be noticeable. Only when you can discern all the small differences within these blocks can you conclude that your monitor’s contrast and saturation settings are correctly configured.