Corsair H100i Elite (2022): 240mm LCS
Today, we take a look at the Corsair H100i Elite (RGB), a newly redesigned 2022 cooler model. All ‘node/hub’ connections has been placed inside the cooling block. Therefore, this device is 100 percent iCUEcompliant and does not need a connection to a hub. Plug it into a USB port, and magic will commence.
The aesthetically revamped and exquisite-looking Corsair H100i Elite edition is paired with their AF120 ELITE Series PWM fans. The cooler is very quiet if you want it to be, and provides enough cooling capacity for even the most modern processors. Processor compatibility also was beefed up with a mounting kit for Threadipper as well as LGA1700 Alder Lake processors from Intel. The H100i Elite liquid cooler features a 240mm radiator with two 120mm fans; these PWM fans are controlled with ICUE, allowing you to customize and monitor this all-in-one liquid cooling solution for your processor. Additionally, the Corsair iCUE app allows you to configure pump LED illumination directly from the program. Today, you may choose from a hundred various heatpipe-based coolers, many of which have identical shapes, sizes, and prices. However, better heatpipe-based cooling are advantageous. Next in line are LCS (liquid cooling) systems, whose entry-level products are inexpensive, simple-to-install liquid cooling kits.
Advanced All-in-One CPU Cooling: Includes everything you need to keep your latest Intel or AMD CPU running at top speed while reducing the heat that even the most powerful CPUs make.
Improved Pump Head Design with 16 RGB LEDs: A modern pump head with 16 diffused RGB LEDs that can be controlled individually creates a unique look and dazzling lighting effects. Elite LCD pump cap is NOT compatible!
Proper Cooling Performance: You can improve the performance of your CPU by using liquid cooling with CORSAIR AF ELITE Series fans that have fluid dynamic bearings and are controlled by PWM.
Specialized Cooling Modes for Quiet Operation: The Zero RPM fan and Variable Pump Speed special cooling modes of iCUE keep noise to a minimum when your system is idle or under low loads.
There are radiators in sizes 240, 280, and 360mm, so you can use them for almost any build. Wide Compatibility: It works with the most recent Intel and AMD motherboard sockets, including LGA 1700, 1200, 115X, 2066, and AM4 /STRX. It is a cooler series that is easy on the eyes and comes with a relatively tool-free installation. The unit will offer good performance, not exceptional, as the key for this release is low noise levels. While we cannot recommend it for reasons we’ll explain later, you could select an optional 0-DBA mode. As long as the coolant stays under 40 Degrees C the fans do not spin. So without further ado, let’s peek at it and head onwards into the review.

Overview
The CORSAIR iCUE RGB ELITE Series liquid CPU coolers provide high-performance CPU cooling, integrated RGB lighting, and refined aesthetics, together with CORSAIR AF ELITE Series PWM fans that provide strong airflow and specific low-noise cooling modes. The ELITE Series has 16 individually controllable RGB LEDs on a contemporary pump head design. Excellent cooling with matching aesthetics. The potent CORSAIR iCUE program allows the creation of spectacular lighting effects. monitor CPU and cooling temperatures, and change fan speeds as necessary. Zero RPM fan and Variable Pump Speed modes are accurately implemented. control noise levels for silent operation. With a thermally optimized copper cold plate and straightforward assembly, the The newest CPU brackets, the RGB ELITE Series provides superior CPU cooling.

-
AF120 ELITE Fans: Two 120mm PWM fans deliver a blast of color and improved airflow for extreme CPU cooling performance.
-
Dynamic RGB Backlit Pump: Individually controlled RGB LEDs light up the pump head to produce stunning, customizable lighting effects to match your build.
-
Extreme CPU cooling: Experience the best ever CORSAIR Hydro Series cooling performance, with each fan running from 400 to 1,850RPM.
-
Powerful Software: CORSAIR iCUE software allows you to control your cooler’s RGB lighting and monitor CPU and coolant temperatures, and adjust fan and pump speeds, all from a single intuitive interface.
-
High-Performance Cold Plate and Pump: Thermally optimized cold plate and low-noise pump design for high performance, quiet cooling.
-
240mm Radiator: Expanded radiator core improves cooling surface area and performance.
-
Zero RPM Mode: A new Zero RPM cooling profile in CORSAIR iCUE software allows fans to stop entirely at low temperatures, eliminating fan noise.
-
Easy to Install: Modular, tool-free mounting bracket for quick and painless installation on all major CPU sockets.
Priced at roughly $140 cooler is compatible with the most popular Intel and AMD sockets, including socket AM4. New is support for Threadripper sTR4/SP3.
Product Gallery
The kit bundle is wrapped, padded, and bundled securely in a box. Let’s open it to examine what’s inside and to what extent this kit requires assembly.

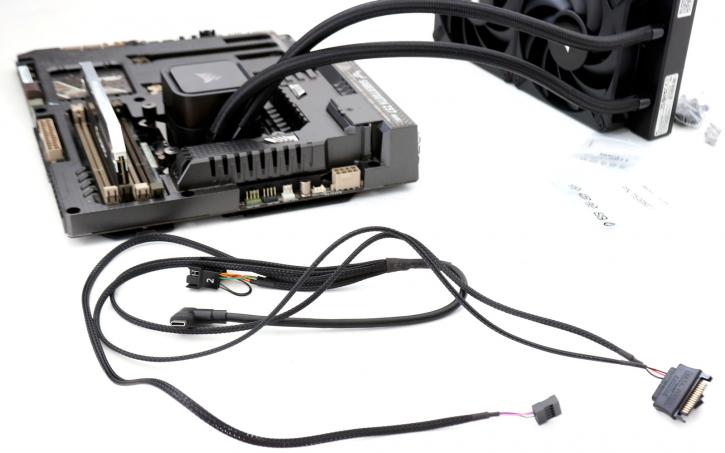
After removing the liquid cooling unit from its packaging, you will see the radiator, fan, tubing, and pump/cooling block. The vast majority is assembled and ready for use. You must install the fans and a mounting bracket to secure the device. However, because you are visiting Guru3D.com, we will, as usual, walk you through the installation procedure over the following several pages.
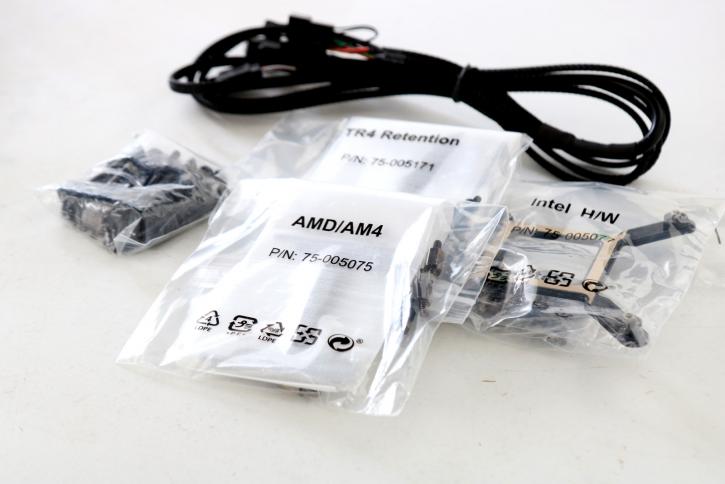
You’ll spot a backplate that supports a wide variety of CPU sockets. Intel LGA 115x, 1366, 1700, 2011, 2066, and AMD AM2, AM3, AM4, FM1, FM2 based processors can be used in combination with this cooler. Lovely to see is support for Threadripper. Included are:
-
CORSAIR H100i Elite 240mm RGB Liquid CPU Cooler
-
Mounting kit for all modern CPU sockets
-
Two ML Series PWM 120mm high-performance fans (2400rpm)
-
Fan and radiator mounting screws
-
Thermal compound (pre-applied)
-
Quick Start Guide
-
Extra faceplate
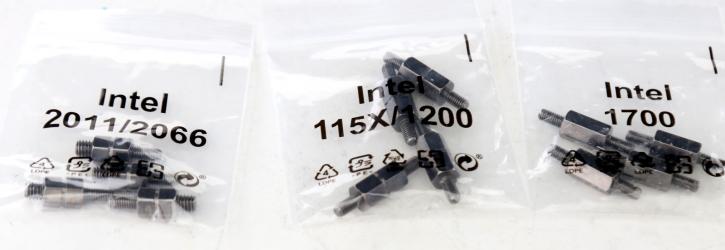
You’ll spot the cooling unit consisting of the radiator assembly, fan, and brackets + backplate that support an extensive range of AMD and Intel processors. A little thermal paste is pre-applied on the cooler for you. I wish manufacturers would add a little extra for reserve in a syringe. We love how well Corsair bundles the bags holding mounting kits these days; you cannot confuse things.

Here we have the package showing the radiator unit and block/pump; we’ll need to mount the variable PWM ML series fans (120mm). The fans are re-wired onto the embedded iCue commander controller (inside the water block). With Corsair’s iCUE software, you may regulate it and set up your RPM preferences and, of course, RGB preferences of that block. We’ll show that later on in the article.
Inside the previous model, a separate Commander Core RGB/fan hub was included carrying a price premium but also a lot of extra wiring. Things have now normalized much better. The downside is that you cannot connect extra fans to your iCue infrastructure.
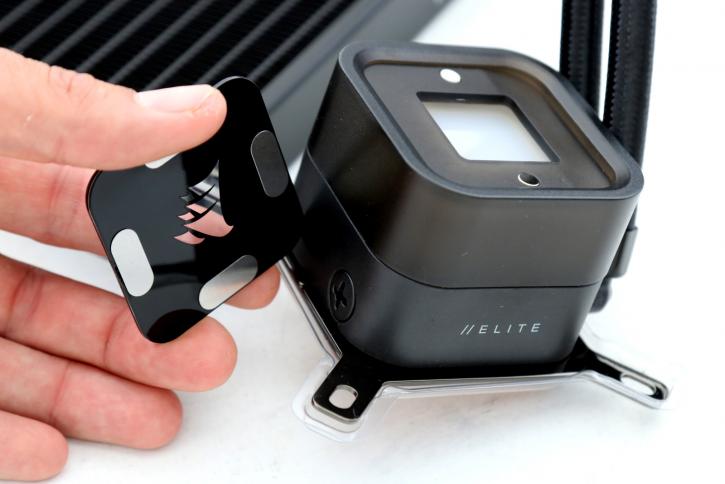
Here we can see the base unit. The cooling block faceplate can be rotated as it’s clipped secure with small magnets.
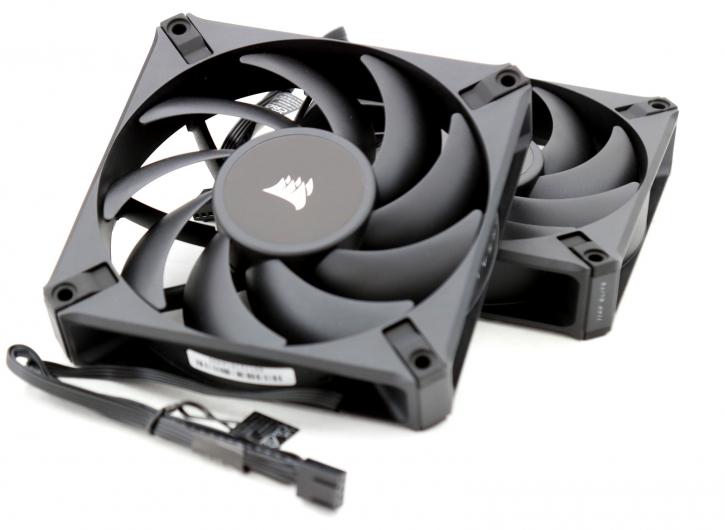
Here are the AF120 ELITE fans with high static pressure. As said, you received two of them, which are all PWM-based. At low RPM, these fans provide a substantial amount of airflow while generating little noise. Once they surpass 1200-1300 RPM, though, the situation changes drastically.

With Corsair’s iCUE software suit, you may pick numerous preset settings ranging from silence to performance, as well as a zero RPM option that deactivates the fans up to 40 degrees Celsius. The default (balanced) arrangement is already moderately silent. However, we will demonstrate all of this in the program overview.
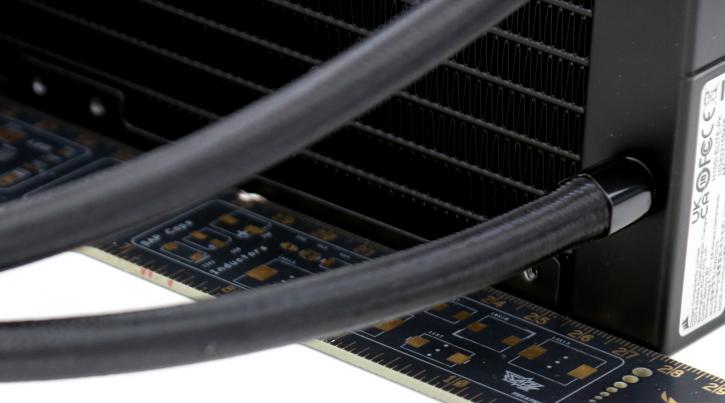
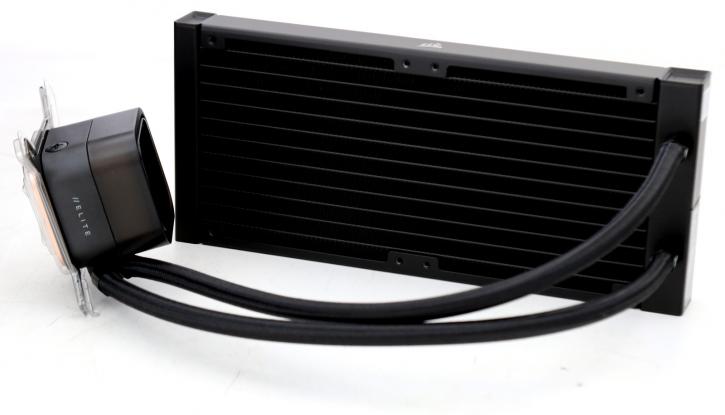
When we turn it over, we can better view the radiator. Most modern big-tower chassis feature pre-drilled holes and room for 240mm radiators, making installation simple. It measures 277 mm by 120 mm by 27 mm.
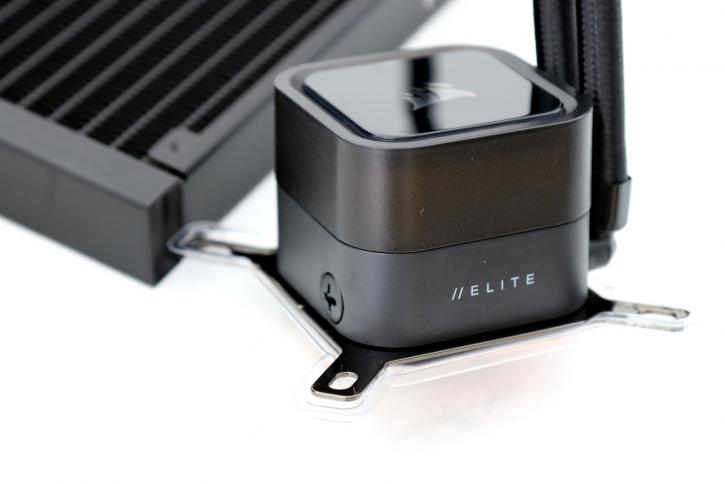
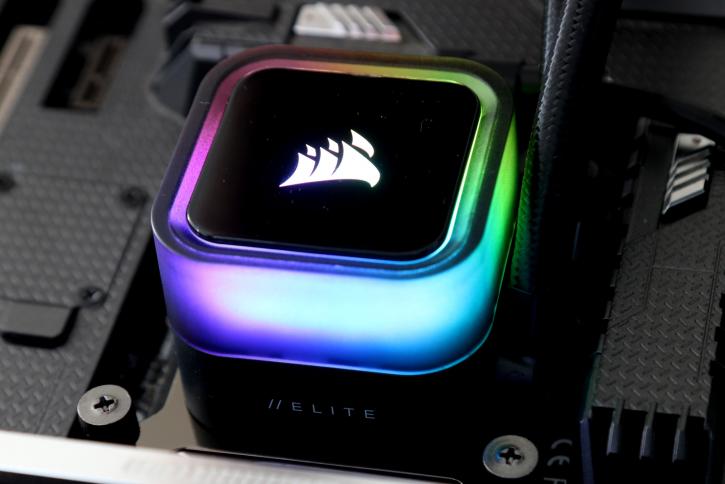
Presented here is the cooling block. Inside is the pump and iCue controller. There was an abundance of cables attached to the device. That, however, has been amended. Only one cable is connected to the HUB and one to the motherboard (pump RPM). New for this model is a dynamic Multi-zone RGB Backlit Pump: The pump head is illuminated by individually-controlled RGB LEDs. Also, the cable, of course, leads to a USB port for iCUE communication.
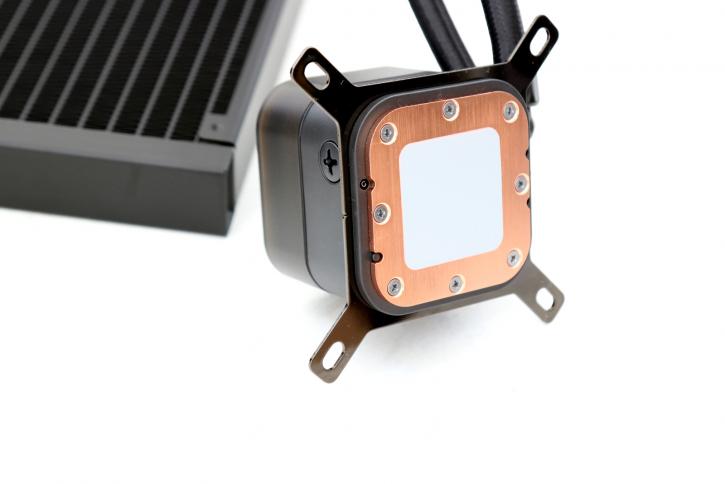
When we turn the CPU cooling block/pump over, we see an all-copper base on which thermal grease (TIM) has already been applied. Not precisely a mirror or lapped finish, but the performance is excellent, as you will soon discover.
The new integrated iCUE controller simplifies wiring; just one connection (USB) must be made to the motherboard, followed by the two fans and SATA for power. No longer must you struggle with a tangled mess of connections, this dramatically enhances the aesthetics of the CPU region
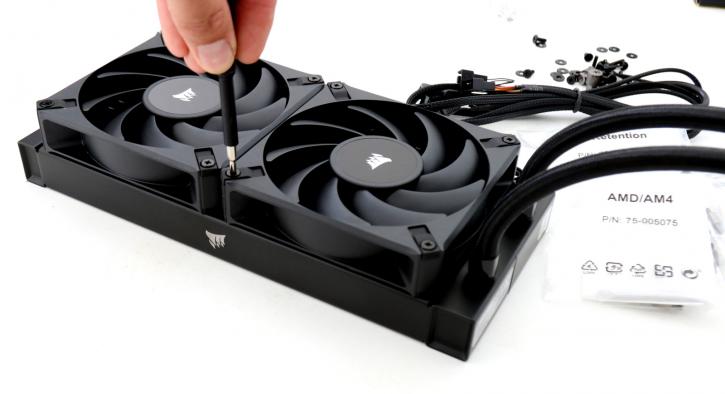
We will now begin the phase in which the installation kit will be assembled. First, we attach the fans to the radiator with four screws each, and remember that the Corsair sticker on your PC case points downwards. AF120 ELITE offers 0; 400 – 1,850 RPM / 0.09 – 1.93 mm-H2O.
Once done, you need to decide where to position your radiator and how the tubing and wiring will be managed. The two fans have connectors connected leading to the HUB wire. The embedded commander is crucial here because it now provides much nicer cable routing.

I’m going to make a small detour here on the faceplate; please look at the image above. Btw’s a nice dark design, right?

You may now position the CPU block to your satisfaction; just take it out and rotate the logo, which is held in place by magnets.
Product Installation
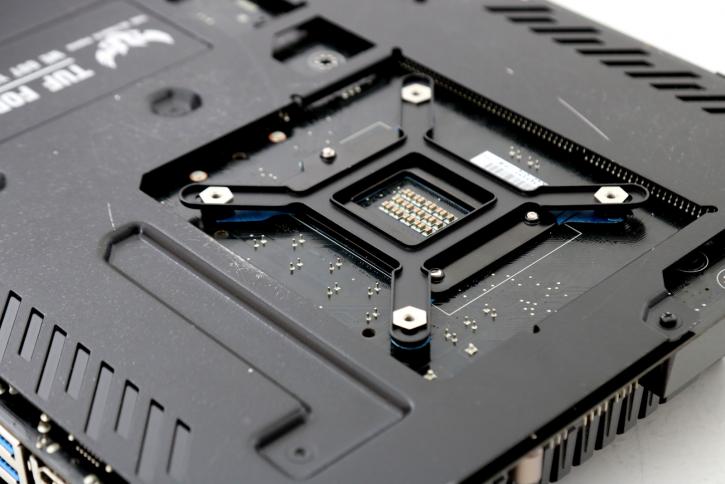
Mounting the cooler is straightforward, however, the motherboard must be removed from the chassis unless you have a chassis with a cutout for CPU cooling. Now, prepare the backplate by aligning the nuts with the holes by moving them into place. You must place the backplate exactly as seen above; there is no other correct method. It’s a design bracket that is robust and very simple to install.
Product Installation
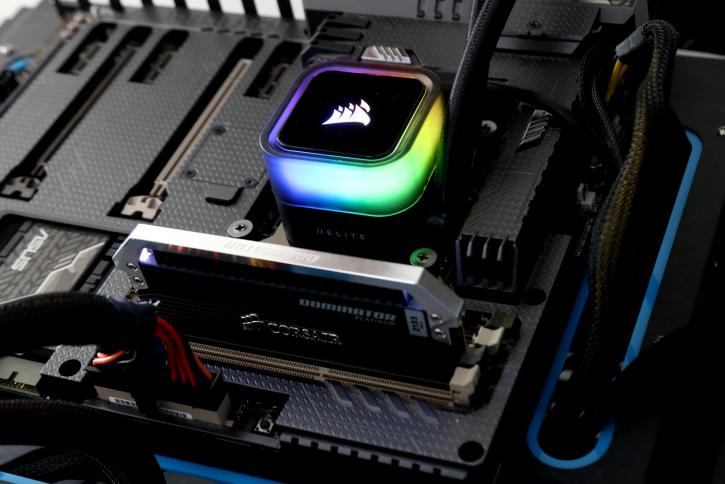
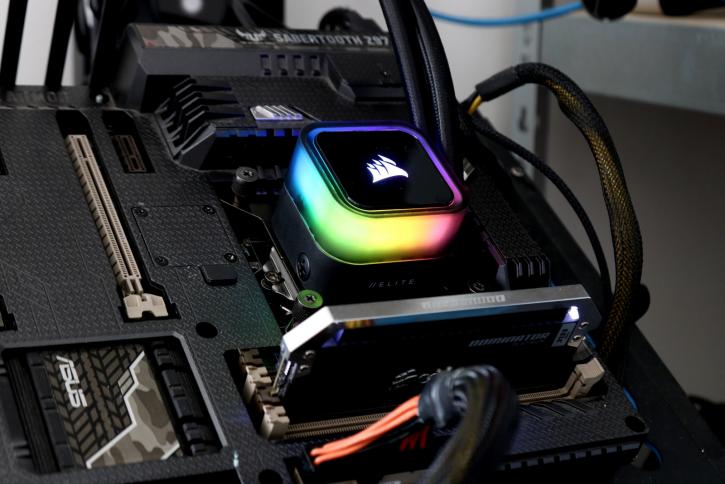
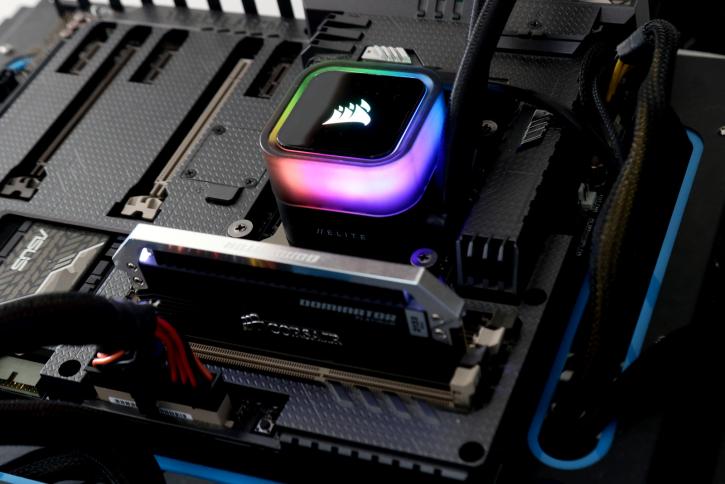
The cooler is being tested externally on an open test bench. Upon activation, the Corsair logo and a lower-positioned ‘ring’ will illuminate with an LED color. It is an RGB LED system. The default setting is color shift, which cycles through all possible basic colors. The colour may be altered; you can also set a dedicated color of choice using the iCUE program, or deactivate it if RGB is not your thing. The octagon has a Multi-Zone LED Pump Head. All are programmable with iCUE, I should note.


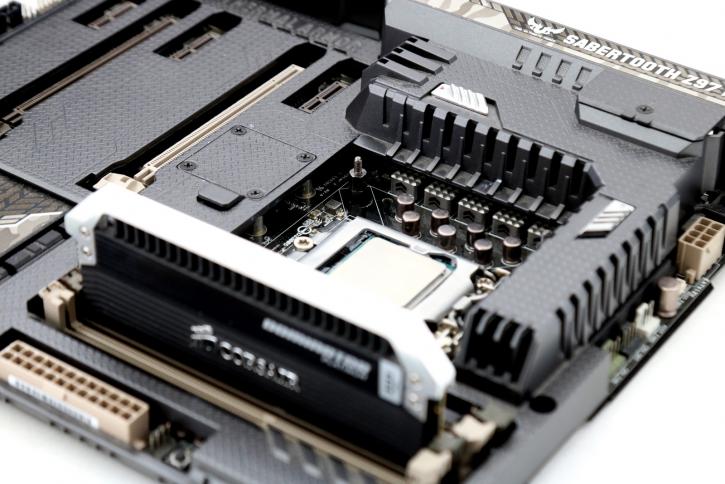
You should have previously installed your CPU; thermal paste is already applied to the cooling block as part of the package. With the backplate in place, the four standoff screws seen above are now installed. The next step is to install the mounting bracket on top of the pump and tighten everything together.
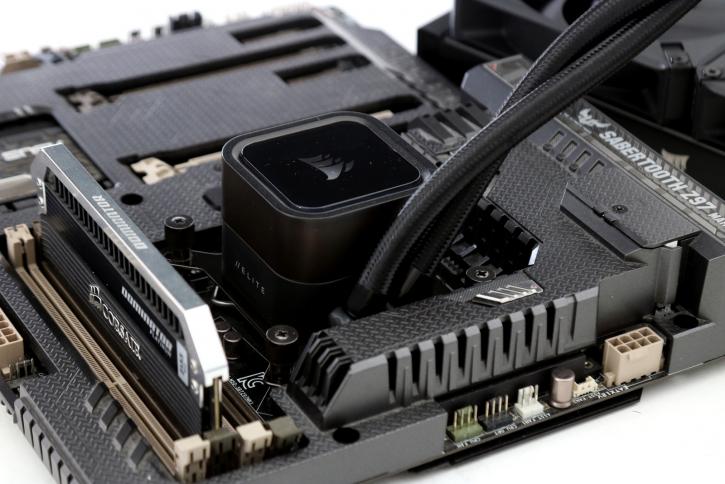
Once the cooler has been positioned, four standoff screws are aligned. Four thumbscrews may be tightened with the use of a screwdriver. Turn them until they cannot be tightened anymore.

Now that you are seated, you may connect the cord. Remember that you must connect the USB cable to a USB port on your motherboard. Once the motherboard is removed, this whole process takes no more than ten minutes; the cooler has been installed and the system is ready for its first test run. The embedded Commander fan/RGB controller makes cables routing so much nicer.
Corsair iCUE
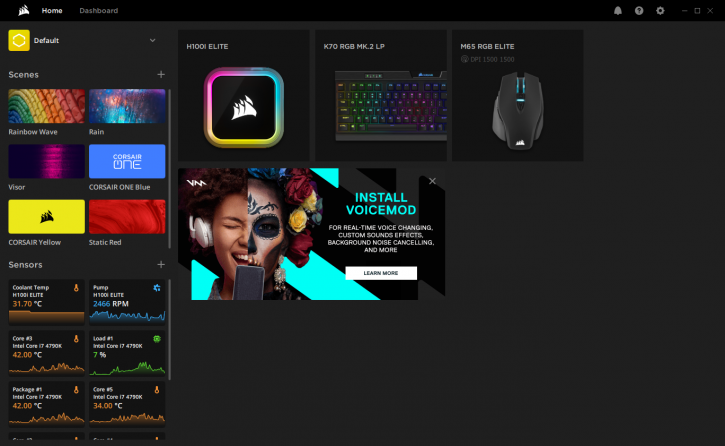
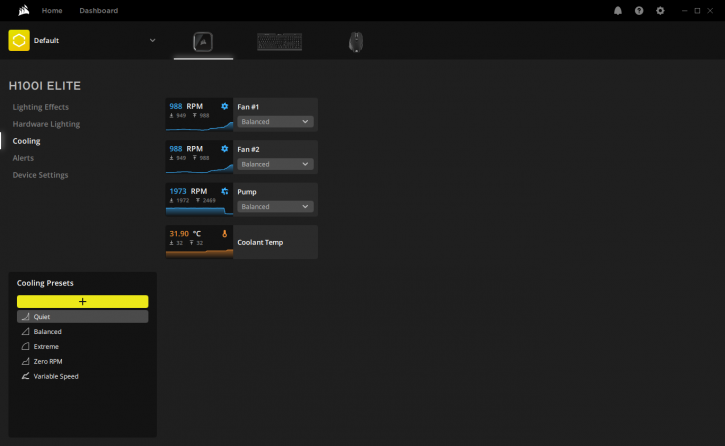
The Corsair iCUE APP is a universal software package that enables monitoring of RPM, temperatures, fan RPM control, and a vast array of other data. Additionally, you may adjust the RGB LED color. The software has detected the cooler (and other associated Corsair equipment) and displays information for LED control, pump control, and fan control/monitoring. For example, each fan may be separately programmed; make your own profile or just select:
-
Quiet
-
Zero RPM (disables fans until the coolant reaches 40 Degrees C)
-
Balanced
-
Extreme
The features enable you to go where you need to; if you need performance, you may have it at the expense of noise, and vice versa if you desire stillness. This is the benefit of software-based control. For this evaluation, we will choose a setting that is quite quiet and balanced. The balanced mode seems to be the ideal option.
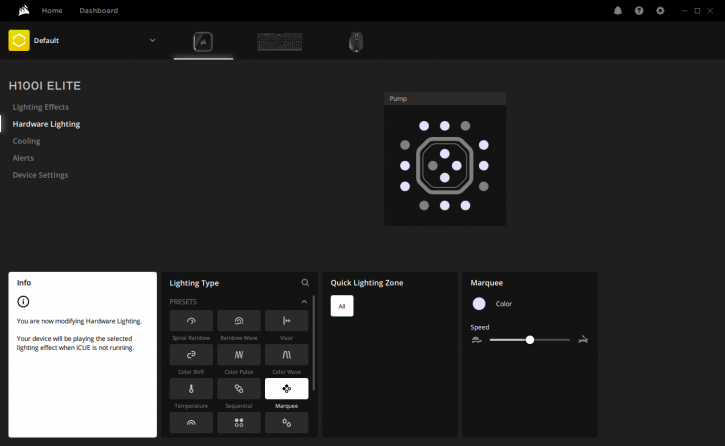
Once you pick LED control, you may control a customizable RGB lighted Corsair logo and ring. You can access several color choices in addition to static, off, and animations such as blink, color pulse, color shift, rainbow (default), and temperature. The software package is frosting on the cake.
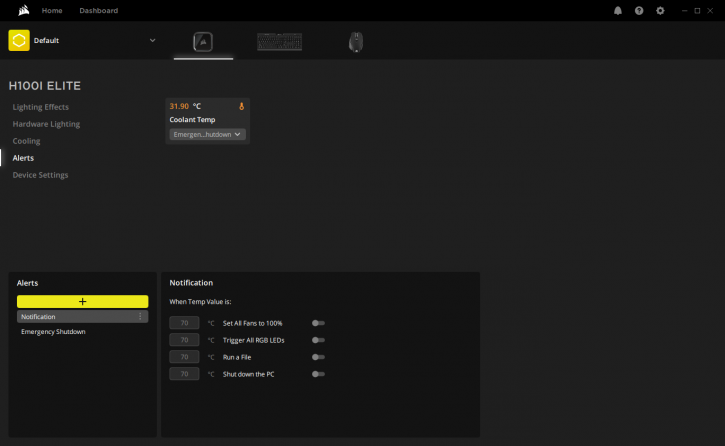
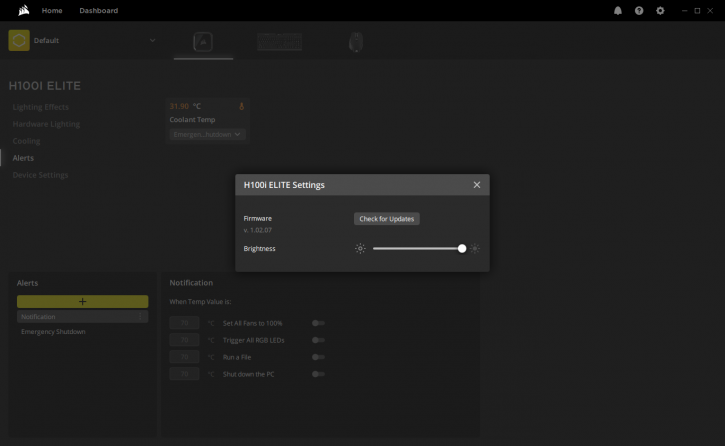

Additionally, you may develop your fan/pump profiles and fine-tune the cooler’s performance and noise levels to your preference.
Preparing the System Overclock
We’ll look at the cooler in several system configurations/conditions. For the audiophiles amongst us, your focus should be noise levels mostly. Then there is your normal non-overclocked mainstream usage and then the performance enthusiast overclocking users. So with the many variables in mind, we’ll be testing three things for the cooler.
-
dBA noise pressure levels
-
Temperature with the CPU at default settings
-
Temperature with the CPU at 4600 MHz with 1.3 Volts applied to the CPU
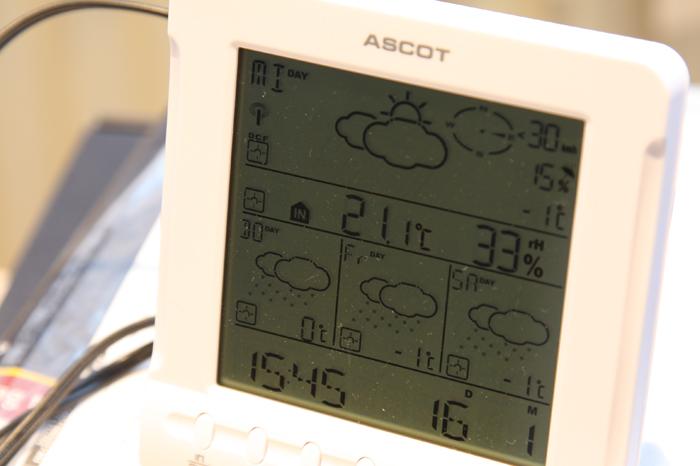
Mind you that all our tests are performed at a room temperature of roughly 21 Degrees C. We still use the Core i7 4790K as it is the hottest processor your money can get you. You guys all know that once overclocked with added voltage, the temperatures get out of control big-time.
Why (still) this processor?
For any processor, at a specific TDP rating, the heat signature is roughly the same for most hot running processors, in the 90 Watt marker. Heat is heat, aside from small differences it doesn’t matter much what processor you use in that same TDP range.
TDP = thermal design power. 90 Watts TDP tells you the maximum heat a computer chip, in this case, a CPU may use in watts. e.g. a dual-core, quad-core or octa-core at 90 Watts still is 90 Watts of heat output, and all would sit under stress at that, e.g. 65 Degrees C range depending on cooler. More watts often mean better performance, but yes higher temperatures and more power consumption as well. Why still the 4790K? Throwing away the many dozens of results we’ve built up over the years would be a waste, and from a thermal design and heat signature, it makes little difference compared to say the 9900K.
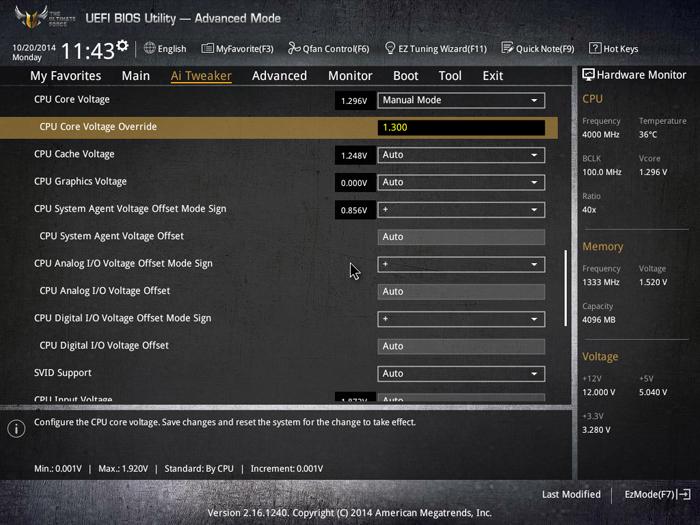
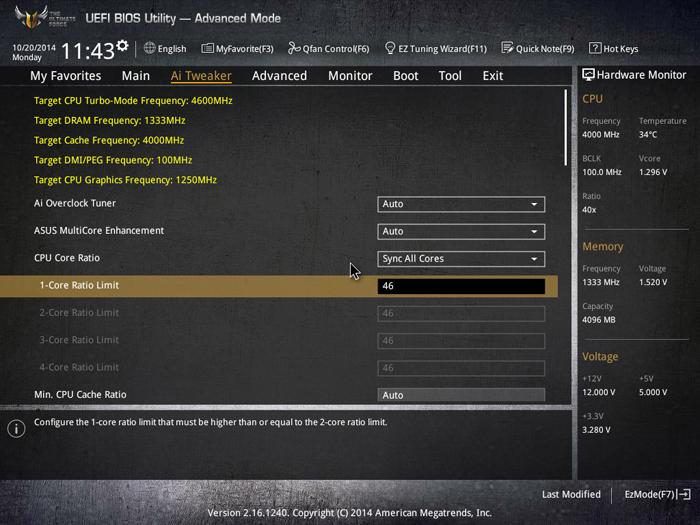
So we’ll be testing that processor at default clock frequencies, and then we’ll blast the processor with 1.30 Volts like shown above. That voltage is not needed for 4600 MHz but typically will bring the processor with a non-performance heatpipe cooler towards 90 Degrees C (!). We are merely trying to see how the cooler will behave under such stringent conditions. All temperatures reported are the processor package, sensor temps. The cores will independently differ a little in Degrees C here and there. We measure at an ambient room temperature of 21 Degrees C.
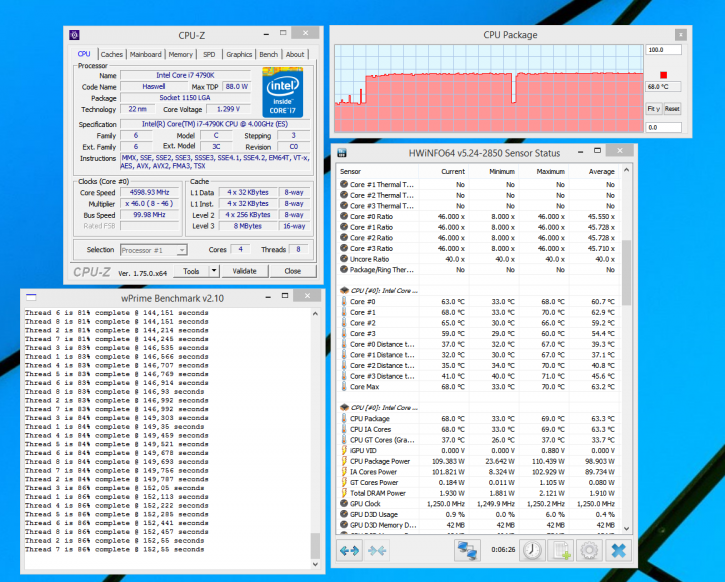
The CPU stressor
We test processor coolers following a strict protocol. We have already shown you the BIOS settings for the overclock. To stress the CPU, we apply the stress modes (default and OC 1.3V) and have our stress software wPrime finish a full run twice. We, however, have a security feature enabled if a cooler reaches 98 Degrees C the system will power down to prevent it from damage. Below, an example of one of our test runs. We note down the package temperature, the per-core temps as such can differ here and there. For LOAD testing, we note down the MAXIMUM measured temperature after a two full wPrime 1000M runs. In the example below, we use a clock setting of 4600 MHz on all CPU cores with a strict 1.3 Volts on the processor.
Testing the cooler
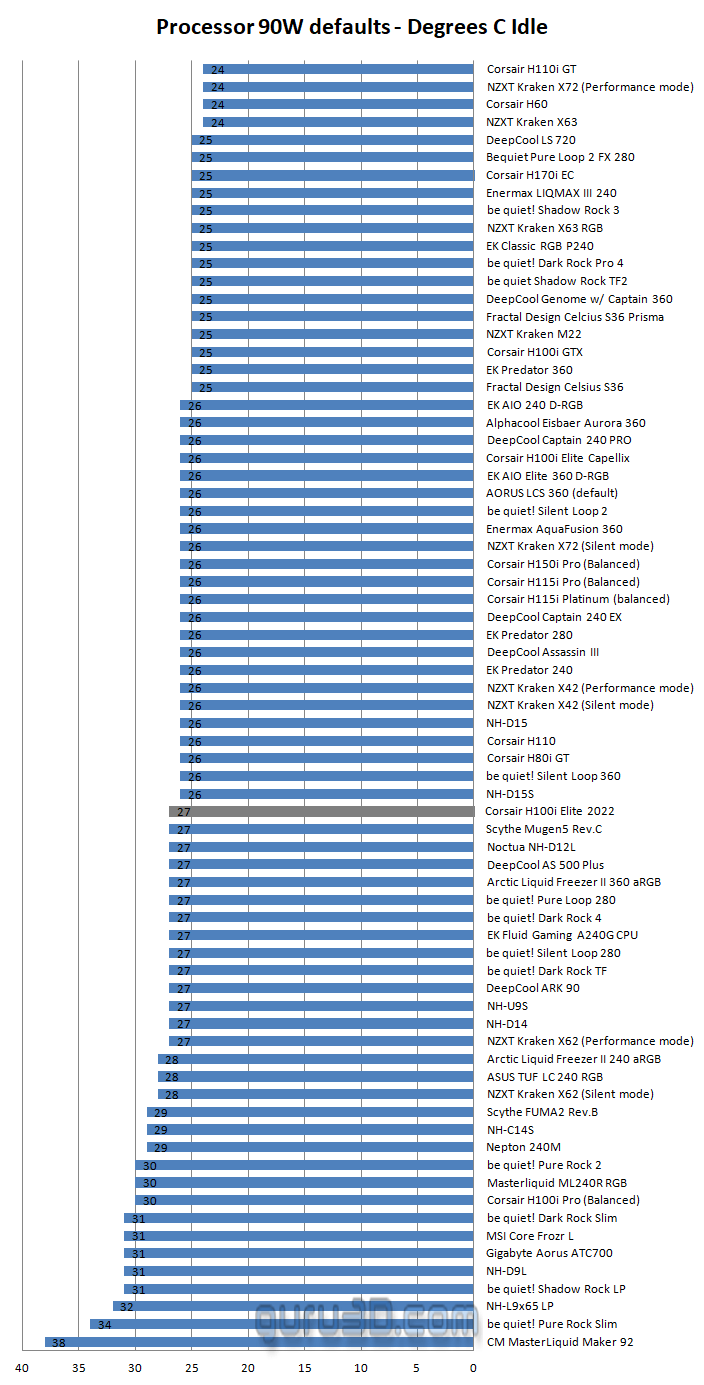
Time for testing. The tested cooler of today will perform admirably with any modern ageprocessor, from low-end to high-end, at its default operating speeds; overclocking is also possible. We have developed a procedure policy for testing cooling benchmarks. Let’s examine the results of the system in its default, non-overclocked configuration. Below, the IDLE temps, indicating that your CPU is doing next to nothing. Simply awaiting processing in your system.
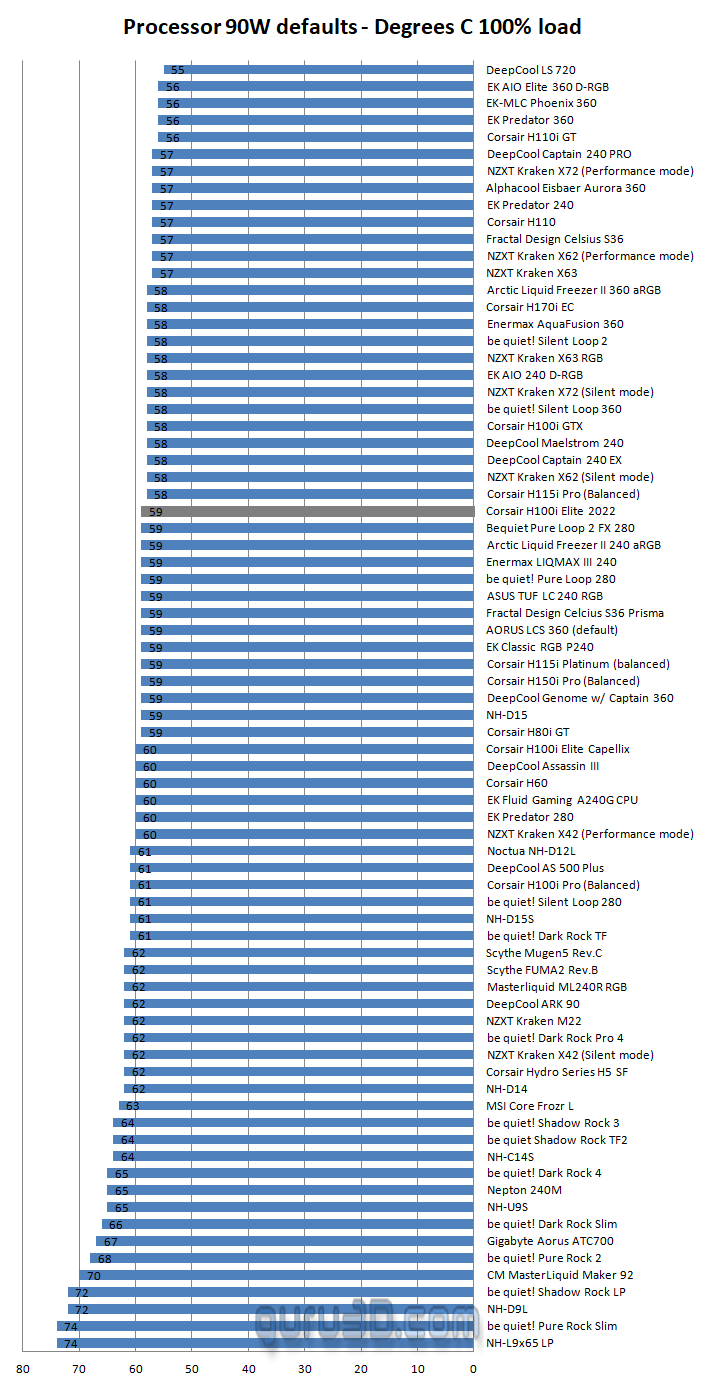
The CPU LOAD temperatures are shown in the chart seen above (in the non-overclocked state). We measure at an ambient room temperature of 21 degrees Celsius. This way ambient temperature has little effect on the cooling performance.
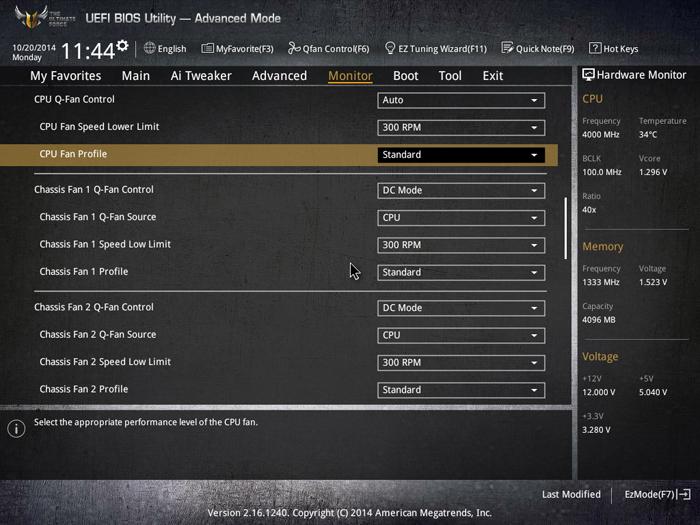
Sidenote: for this test we stick to the ‘balanced’ setting for fans and pump.
Guru3D’s rule of thumb on CPU load vs cooling temps:
-
Anything up-to to roughly 50 Degrees C or lower we consider enthusiast-class cooling
-
Anything in-between 51 to 60 Degrees C we consider performance cooling
-
Anything in-between 61 to 70 Degrees C we consider mainstream cooling
-
Anything above 71 Degrees C we consider average cooling
This LCS kit thus sits at the threshold of performance cooling at processor default clock frequencies.
Acoustic Performance
With a certified dBA meter, we measure how many DBAs originate from the PC. It’s slightly subjective as there is always noise in the background, from the streets, from the HD, PSU fan, etc so this is by a mile or two, not a precise measurement. You could only achieve objective measurement in a sound test chamber. Take this measurement as an indication, not a precise measurement, please.
The human hearing system has different sensitivities at different frequencies. This means that the perception of noise is not at all equal at every frequency. Noise with significant measured levels (in dB) at high or low frequencies will not be as annoying as it would be when its energy is concentrated in the middle frequencies. In other words, the measured noise levels in dB will not reflect the actual human perception of the loudness of the noise. That’s why we measure the dBA level. A specific circuit is added to the sound level meter to correct its reading in regard to this concept. This reading is the noise level in dBA. The letter A is added to indicate the correction that was made in the measurement. Frequencies below 1kHz and above 6kHz are attenuated, whereas frequencies between 1kHz and 6kHz are amplified by the A weighting.
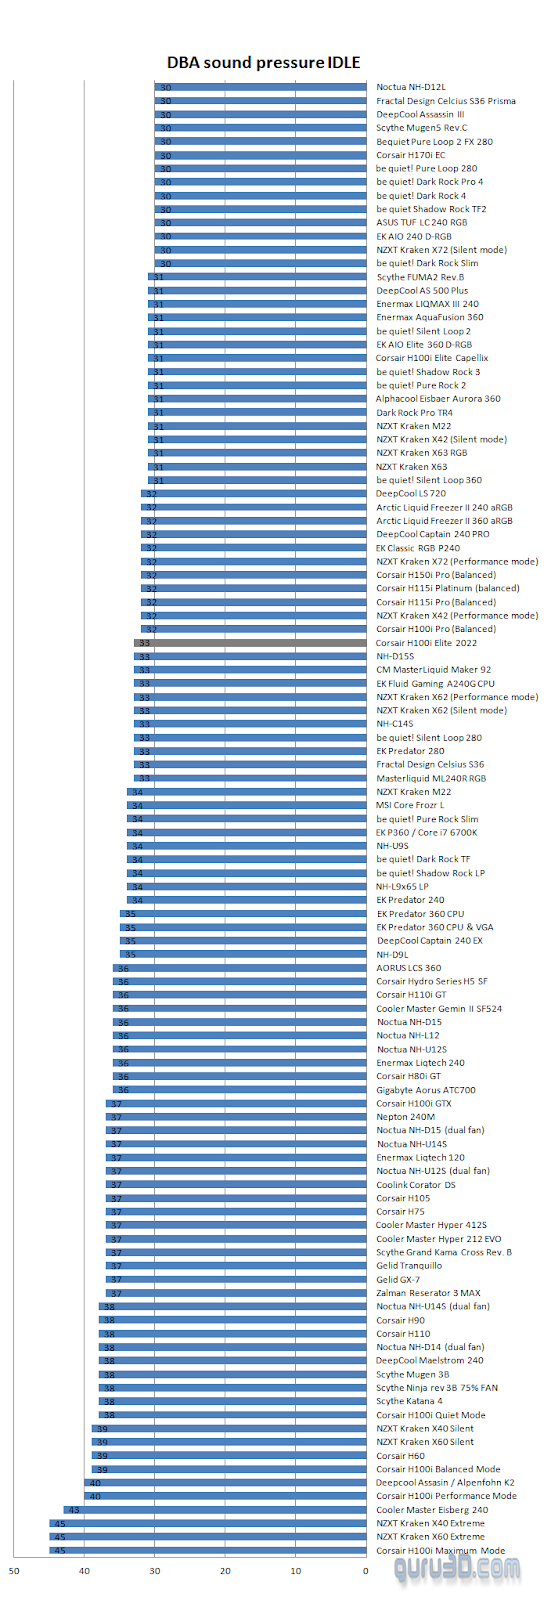
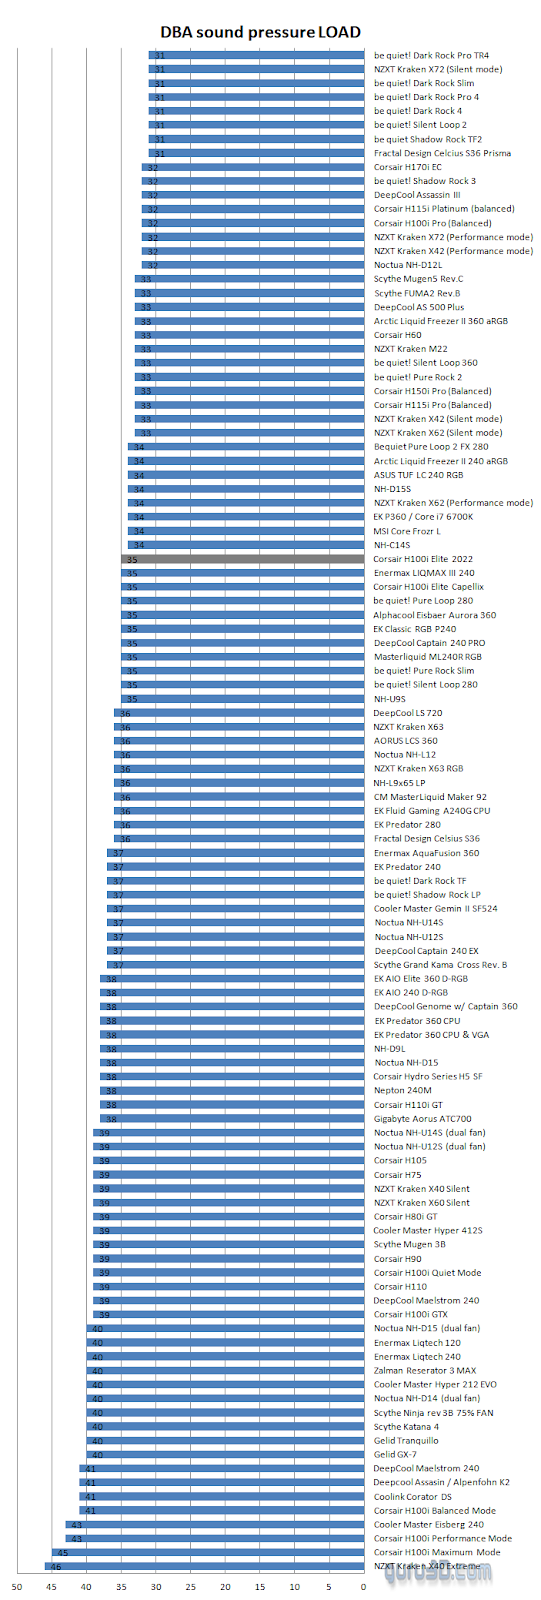
In idle, you hardly hear the fans. Once we put the processor at 100% load with several full wPrime runs. Noise pressure is not an issue at default.
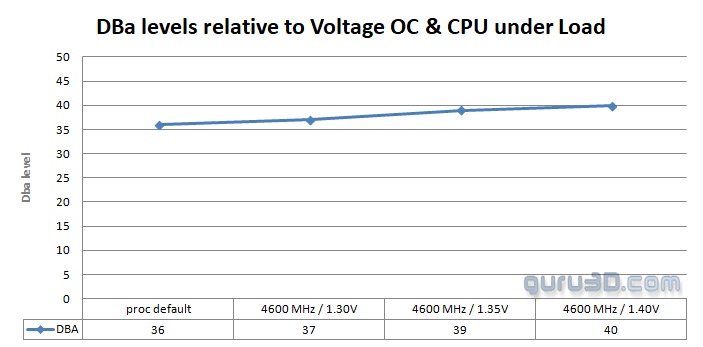
So that begs the question: what happens when we overclock? Well, DBa levels only return to normal after the CPU is supplied with 1.35V and overclocked. In general, though, the product stays rather tranquil. You can modify the FAN RPM behavior to your satisfaction at the expense of performance.
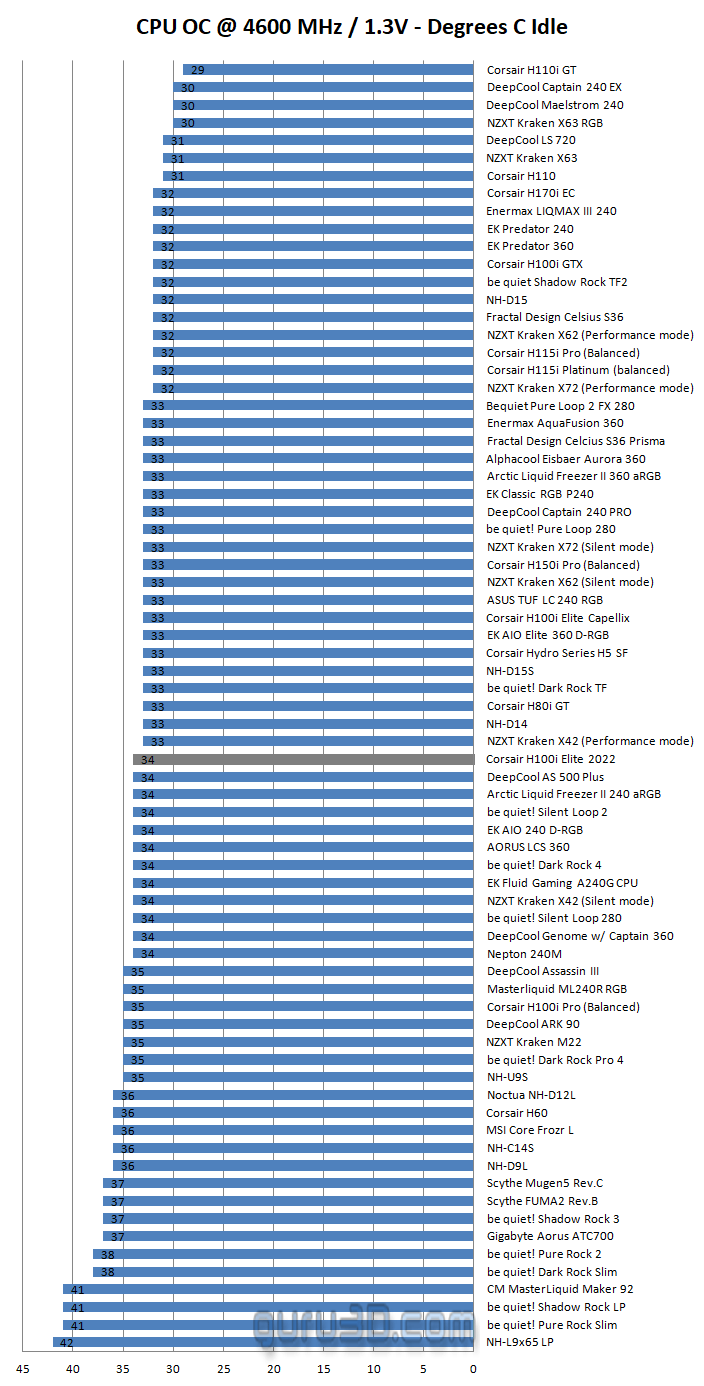
The processor at 4600 MHz with higher Voltage
Now we up the ante. Understand that 1.30V and higher voltages are the levels where Haswell processors get into serious problems due to the aforementioned heat-spreader versus TIM design applied solution from Intel. We now set apply 1.30 volts / 4600 MHz all cores on the CPU while loading it with 100% stress for wPrime to run on all available CPU threads three times. Below, you can see the IDLE results with the Core i7 clocked @ 4600 GHz with 1.30 volts on the CPU. Again, the results are the IDLE temperatures thus you are on your desktop doing pretty much nothing.

So while there is a bunch of capacity left, the cooler will continuously balance in-between silence and cooling capacity, preferring acoustics.

To advance on overclocking to see where our thermal threshold (the point of no return) is we tweak in four stages where we up the core voltage from 1.30v upwards to a more (unrealistic) 1.40v. At 1.35 volts most heat pipe coolers, for example, would fail this test and break say 90 Degrees C. LCS units often have a bit more reserve here.

You can see the unit performs moderately well, however one we hit 1.40v the fans kicked in harder, immediately showing the cooling capacity as the heat curves will flatten down. The LCS has the proper cooling capacity to offer, but obviously, that is relative to acoustics.
Final words and conclusion
We evaluated the smallest 240mm kit; which delivers properly. This kit is mainly a modification of the previous model, but Corsair was able to eliminate the separate commander controller and integrate iCUE functions into the cooling block. This not only helps save costs but also substantially simplifies cable routing since there is only one wire from which all cables originate. The terms lovely and dark, and understated come to mind when considering the new design style. In hindsight, the evaluated version lacks RGB fans, but we’re okay with it. Cooling performance seems comparable to previously tested models (which is a good thing). While the default CPU clock frequency performance yielded more conventional results, the reverse was true when we began to make adjustments. It is a good product with enough cooling capability, even for this 240mm variant with a smaller radiator. The inclusion of AF120 ELITE fans is a wonderful touch. At full voltage 12v, they create a great ordeal of noise; hence, people frown upon them. However, they are not intended to operate at 12 volts; we’re talking about low RPM airflow at, say, 3 volts and 500 RPM. The airflow of these fans is greater than typical. These fans move the correct quantity of air at a low RPM. And since they can do so at low RPM, the package delivers less noise and more airflow.
Additionally, they are PWM-compatible, with iCUE’s ability to handle everything through software, you realize that you have just acquired an extraordinarily adaptable and aesthetically pleasing solution. Simply plug in the device and put it to balanced or quiet mode. This option provides adequate performance at barely audible decibel settings (if you can hear it at all).
Aesthetics & Design
The way it looks as a whole is very nice. This is, of course, a personal opinion. You’ll get that all-black design, which makes it a nice-looking product. Another benefit of using iCUE is that you can match up any RGB color with the Corsair logo that is built into the cooling block. We can imagine that you would change it to red if you had a motherboard with an ASUS ROG theme, or orange if you had a Gigabyte Aorus motherboard, and maybe white if you had an MSI Titanium series motherboard. It really gives your final PC build and color scheme a “finished” look. Remember that iCUE can get all of your Corsair parts to work together and that the software has come a long way since it was first released. I’m not saying it’s perfect, but it has turned into something distinguished.
Installation
The kit’s mounting system made it easy to put together, just like the other models. The closed loop of coolant is added at the factory. Put the backplate and standoff screws in place, move the cooler, and tighten it. This kit will look great on any PC because it is black. It’s just a good alternative to heat-pipe coolers, and it’s also pretty quiet and looks good. In just ten minutes, you don’t need any “advanced” skills to put the kit together.
Pricing
So here’s where things change: the Corsair H100i ELITE was released at about 140 USD. We think that prices in the EU will be slightly higher at 150 EUR, but that will depend on the VAT in your country and the difference between USD and EURO. The H115i will cost 160 USD; the H150i is to cost 180 USD.
Conclusion
We can say it quickly: we’re impressed for a 240mm kit. Not so much the way it works by default, but the extra cooling capacity. Once we sped up the processor, this cute little setup could handle the extra heat without a problem. The way it works is just fine, but it looks great. Set the fans and pump to silent mode, and you’ll never have to worry about noise again. You’ll love it. t balanced mode, the kit is still silent, but you could hear the pump a little. You can, however, tweak:
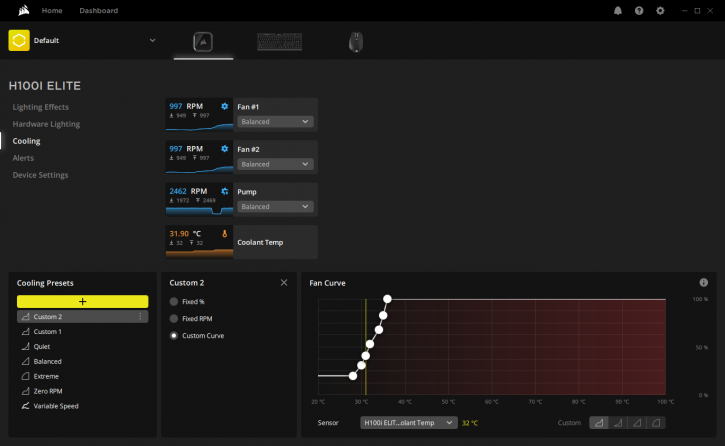
RPM behavior can be changed based on your preferences is even more significant. When you create a new profile (+) in the iQUE TAB, you can make a custom profile and set your fans to 500 rpm, fixed, or make your own delta, say run 500 RPM until 75 Degrees C is reached, then kick things up into 6th gear. The performance, as stated, can be tweaked. We do like that an iCUE Commander is embedded inside that CPU block, though, because it makes it easier to route the cables. In conclusion, the cooling performance is good; the low but configurable noise levels are fine, and the looks are even better with this newly revamped style. This is a highly recommended LCS cooler with which you’ll have a lot of fun.
Handy related downloads:
-
Sign up to receive a notification when we publish a new article