Asus ROG Swift OLED PG42UQ Monitor Review

Before we overlook it, there are two models. The Asus ROG Swift OLED PG48UQ and PG42UQ appear to be worthy competitors for the title of the biggest gaming monitor. Asus claims both monitors can reach 900 nits of peak brightness due to their unique passive heatsinks. This, along with the ink blacks of their OLED displays, should result in an incredibly dynamic and bright image in low-light settings. Each model is factory calibrated for color accuracy with a Delta E of less than two. A uniform brightness toggle reduces peak brightness for more pleasant viewing when reading web pages or file explorer tabs, for example. Asus ROG describes the PG42UQ and PG48UQ as having a “unique panel sub-pixel arrangement” that should reduce any distracting fringing on text elements. Unlike televisions, the monitors will switch off automatically when you shut down your PC.
What about that OLED burn-in?
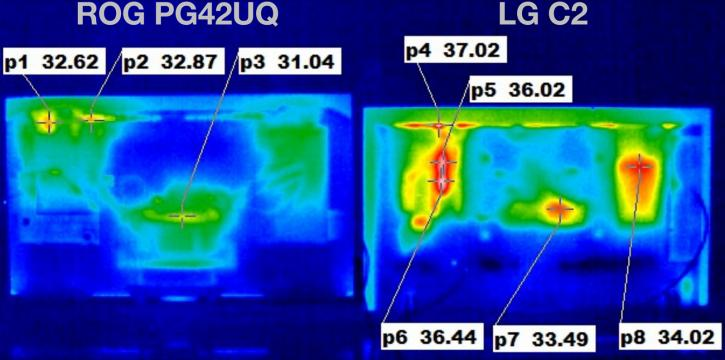
Much has been written and debated about OLED burn-in and image preservation. Fortunately, the panel has a few measures that prevent this from happening. ASUS is cooling this monitor with heatsink; the thermal image below shows what is happening there.
We encourage that owners comply to guidelines, such as keeping all of the built-in Screen Protection functions enabled and completing or allowing the display to complete a Pixel Cleaning cycle regularly. If you intend to leave the display powered on for extended periods, ASUS also recommends installing a desktop screen saver. There should be no profound worries about burn-in if these steps are followed. After 8 hours of inactivity, a Pixel Cleaning notification appears for 15 seconds. The warning will appear for 15 seconds every four hours until Pixel Cleaning is complete. If the user turns off the monitor, Pixel Cleaning will begin automatically and take around 6 minutes to complete. If the monitor is turned on before the Pixel Cleaning cycle is finished, it will take a few seconds longer to boot up. Every 4 hours, the Pixel Cleaning notification will be displayed for 15 seconds. The message timer will not be reset until the entire 6-minute cleaning cycle is completed. Yeah, so that’s the compromise you need to make if you pursue an OLED gaming screen.
The Monitor
We received this monitor a week or so ago. You can spot them in retail as of today, closing in at 1500-1600 EUR/USD, which is a lot of money right. Well, let’s unbox.

The ASUS ROG Swift PG42UQ monitor has a design that is very similar to the other ROG monitors in terms of appearance. As a result, this screen will stand out from the masses. ASUS has included a new brightness uniformity feature, which delivers greater constancy in brightness levels. This is a ROG-exclusive feature that helps the PG42UQ stand out from the crowd.

The box’s shell pulls off, exposing the monitor, with construction requiring two people to complete. Four simple screws secure the stand to the back of the display. This is the sole piece of hardware required for this display. Once unpacked you can see a very nice thin OLED screen though; however, backed by heatsinks making it thicker again. The product is carefully packaged. No loose separated power brick this round, just connect your cables.

The PG2UQX is equipped with cooling for the components behind the display panel. All you need to do is mount the stand with four screws, and hook it up.

Included are DP, HDMI, power cable and a manual as well as other small stuff. On the bottom of the screen, there is a useful 5-way navigational joystick for adjusting the settings and OSD, as well as a small and reasonably simple remote control. The screen includes decent 10W speakers as well.

PG42UQ has little circular pads on the pressure points of the stand to aid boost the stability of the panel – ideal for people who don’t have a high-end desk. Moving back, there aren’t many visual features to discuss. A huge ROG logo can be found on the back, along with a number of vents that aid in the operation of the monitor’s innovative heatsink system. To help keep temperatures down, a huge grill has been added at the top of the display. Here we see the monitor on its belly; of course, protective foam is still on the front side. You can spot the ASUS ROG logo, at the bottom side controls, and to the left side connectivity. The power cable connects (weirdly enough to the right). We’ll show you that in more detail on the following pages though.

The screen is matte black, and there is some reflection, the photo does show that due to our all-bright lit testing grounds. Additionally, the ASUS PG42UQ employs a matte anti-glare covering. As a result of the OLED display, ASUS has decided for a glass front instead of the more conventional plastic. However, 42 inches is the proper screen size for this resolution if you talk pixels per inch. We’d say gaming cough versus big screen 🙂

Back to the glare; the ROG PG42UQ’s anti-glare coating effectively scatters incoming light sitting in front of it. When using word processing applications, browsing the web, editing photos, or managing windows, the dynamic brightness feature of OLED displays causes some luminance fluctuations. Due to the APL curve, which is set to approximately 500 nits for 10% and 130 nits for 100%. As we learned, the uniform brightness setting restricts the maximum luminance to 180 nits, so minimizing the effect of brightness modulation. Realistically though, in an office or game room, that fine.

A slight tilt adjustment is offered by the stand. On tilt, you get 5 degrees forward and backward; that’s it. You need to like the RoG styling; of course, that’s not for everybody, while others will love it. Most televisions will turn off if no input signal is present; therefore, when a PC wakes from sleep, the user must manually turn on the display. The ROG PG42UQ is set to standby, allowing for automatic wake-up with the PC.

The backside is not that impressive; design-wise, as mentioned, you’ll get two HDMI 2.1, two HDMI 2.0, one Display port 1.4 port, and a USB hub available for gaming on PC or Mac, the latest consoles, and tethering to other sources.

Asus has included a USB port on the top of the display (covered by that red rubber insert), which is a little surprising initially. However, the idea for this is that when the mounting hole is combined with the display, game streamers can elegantly attach a camera on the top of the display (which is the hole in the middle). In addition to the top-mounted USB port, two additional USB ports are located next to the IO inputs.

Compared to most other monitors, the PG42UQ’s on-screen display (OSD) operates differently. It also differs from prior ROG monitors, which had a set of buttons on the right back of the screen. Now a joystick knob and two buttons remain located at the bottom side.

The PG42UQ has a pretty wide stretching joystick knob in the center of the screen, which allows you to scroll through the menu swiftly. It is accompanied by two buttons for ‘power on/off and ‘OK,’ which allow you to exit the menu fast. It works really well.

We’ve already stated enough about the connectors, but 2x HDMI 2.0, 2x HDMO 2.1 and 1x DP 1.4 alongside USB connectivity is what you will receive. Display Stream Compression (also known as DSC) is supported by the DisplayPort connection, which means we can achieve full 4K 120 of OCed higher 138 Hz RGB support without chroma subsampling. A significant issue with the first generation of 4K 144Hz displays, although it has since been fixed. With the PG42UQ, you can get 8-bit+FRC at 4K 144Hz or native 10-bit at up to 4K 120Hz on a single channel. On Overclocking, both the PG42UQ and PG48UQ can be overclocked to 138 Hz and enable DSC for image quality (your graphics card needs to support DCS, though).

-
REAR I/O: 2 x HDMI 2.1, 1 x DP1.4, AND USB 3.0 I/O PORTS
-
SIDE I/O: 2 X HDMI 2.0, 3.5MM HEADPHONE OUTPUT
-
TOP: USB 3.0 PORT FOR WEBCAMS AND PERIPHERALS
Because most televisions turn off when no input signal is present, the user must manually turn on the display when a PC wakes from sleep. The ROG PG42UQ is set to standby mode, allowing for automated wake-up with the PC.

The On-Screen Display
A couple of photographs illustrating this monitor’s on-screen display and functioning are included below. The PG42UQ knob beneath the screen allows you to browse through the menus quickly. Two buttons on either side of this knob correspond to ‘Back’ and ‘OK.’ The menu’s usability is decent since you can easily browse through it, and everything is properly defined. The OSD is activated by clicking the joystick once and then moving left or right. A crosshair, framerate counter, and timer are among the tools available. That’s next to all preferences, of course.


Color space and screen uniformity
We start our tests by measuring color space and screen uniformity. Uncalibrated performance means the out-of-the-box settings a monitor ships with. Calibrated performance is what results after the monitor has been put through our DataColor Spyder calibration process. Our aim with calibration is to be at a Gamma of 2.2 with a target 6500k color temperature and an aim of 120cd/m2 brightness. Luminance is candelas per square meter (cd/m2), also described as ‘nits’. By default, the screen is setup in Racing mode where it matches a perfect 00% of the sRGB colorspace and 88% of Adobe RGB (close to DCI-P3).

The sRGB range is fully covered; however Adobe RGB (close to DCI-P3), is nowhere near advertised values.
Gamma
These monitors come factory calibrated for you; we aim for a gamma of 2.2, which is also the default for the ASUS configuration.

Gamma deviation uncalibrated was close at 2.3; there is an allowance deviation of 10%, so that is still fine. This is the monitor untouched out of the box aside from a rest back to firmware defaults. Of course, you can alter and tweak anything to your liking as the monitor has selectable gamma modes.

ASUS promises a color-accurate delta <2.0 or better. From a practical perspective, the average human eye cannot detect any color differences with a Delta-E value of 3 or less. An exceptionally trained and sensitive human eye will only be able to perceive color differences with a Delta-E of 1 or above. The monitor is excellent at an △E<1 average.

Panel color uniformity
The thesis behind screen uniformity is how the image is distributed across the screen. A uniform screen displays an image that remains consistent in terms of clarity, color, and brightness at all points across the display area. We test at 50% and 67% brightness levels.


Above, the screen color uniformity (the same colors measured at nine different parts of the screen). This is an attractive result.
Panel Luminance uniformity
A screen can be a non-uniform screen. On an all-white background, such a screen has a somewhat dirty appearance, with things like banding visible. However, as bad as this sounds it may not noticeably affect the image when looking at colored content like your desktop and/or gaming.


Panel luminance or brightness uniformity tells us how well the screen is lit up by the LEDs and where it is brighter compared to other spots. We measure at nine hotspots on the screen, with slightly varying results. Things are very consistent despite what you might think about the percentage values. For any result in this chapter, a value of under 20% is not noticeable to the untrained eye. Excellent results, albeit with OLED, we expected margins to be even smaller as the lower right side of the panel is deviating slightly.
Contrast ratio
Here, we undertake a simple contrast test that is both tough and realistic. The contrast ratio is the ratio of light coming from the screen when it is supposed to display bright white to light coming from the screen when it is supposed to display pure black. Overall, contrast ratios on LCD panels range from about a dismal 150:1 to a very good 800:1 or even greater.

For everyday tasks such as photo editing and Office, a contrast ratio of 400:1 or more is considered adequate. The problem is that even if you watch a movie on such a monitor in a dim location, you will realize that ‘black is not truly black.’ Laptop monitors are an excellent example (though much better these days), as they frequently have low contrast ratios (150:1 when viewed straight-on and below 80:1 at relatively small angles). A set of test photos with black and white luminance values are used to perform the measurement.
OLED black levels are unmeasurable( the pixel is deactivated) by any currently accessible tools; their contrast is mathematically infinite. The next best option is a VA monitor, but they pale in contrast to OLED. It doesn’t get any better than this.

The contrast ratio is a property of a display system, defined as the ratio of the luminance of the brightest color (white) to that of the darkest color (black) that the system can produce. A high contrast ratio is a desired aspect of any display. The static contrast ratio is limited by the panel technology being used. A TN or IPS technology panel is limited by a contrast ratio of around 900 – 1200:1, and on a VA type panel you might reach up to around 2000 to even 3000:1. We could not measure a whole black field in this OLED as planned because it is just too dark for our meter to register.
Maximum brightness
To see how well a monitor behaves in heavily lit areas with a lot of sunlight, we look at maximum brightness in white. You can measure the output quite easily. Overall the screen shows a proper and decent brightness level close to the advertised brightness level range.

Before you go WTF, here’s what is happening. SDR is rated advertised at 450 cd/m2 (typical). When using word processing apps, perusing the web, editing photographs, or manipulating windows, the dynamic brightness feature of OLED panels causes perceptible luminance fluctuations. The APL curve is set to 500 nits for 10% and 130 nits for 100%. Uniform Brightness setting restricts the peak luminance to 180 nits, reducing the impact of brightness modulation.
An OLED monitor is not for you if you seek maximum brightness. Despite advancements, a premium LCD will be significantly brighter. Most LCD-based HDR displays have a maximum brightness of 400 nits. The brightness was uniform from edge to edge. There was no bleed, glow, or vignetting, which can be seen as darker corners.
Viewing Angle & Color Temperature Offset
Monitors are often advertised as having a viewing angle of somewhere between 140 and 165 degrees. This means that you can still see what’s on the display if you are looking at it at 70 to 83 degrees from the side. However, most of the time, you will be sitting roughly straight in front of the screen, which means that you are looking at 0 degrees to the center of the screen and, at most, 45 degrees to the sides. Compared to the advertised viewing angle, it is much more relevant that the display does not change brightness or color in the corners. Above, a 0% view angle, we look directly at the screen. Below, the viewing angle at sharper horizontally positioned camera angles. At an angle of almost 40 degrees here’s where TN panels normally run into issues, IPS and VA are way better in this respect.

Photos absolutely blow to show the effect properly, when you look at brightness and discoloration alongside the viewing angle then that will tell you something about the image quality when you are not looking straight at the screen. TN screens would show discoloration to some degree whereas IPS and VA screens are less sensitive to that. Viewing angles for monitors are relative and a fairly subjective thing, as I assume, you’ll be sitting directly in front of your monitor. Our overall subjective rating; very good.
These images emphasize two points. OLED panels have greater off-axis image quality than LCD displays, although they are not flawless. A minor green shift can be seen at 45 degrees to the sides and from above. However, light output remains very constant, and detail remains consistent. We scarcely noticed anything when we moved off center in the material. Another thing visible here is more minor reflections. For the best image, placement should be carefully examined. Any bright light source, such as the sun or a lamp, will be detected. The light does not wash out the image, but the reflections do.
Color temp target 6500K

We approach color precision in a simple understanding way, and to explain the method, this test is simple. We look at how close the screen is to a color temperature of 6500 Kelvin based on the default color space. This test is done at default monitor settings. The screen, however, has many presets you can choose from and some very specific RGB color control preferences. The sky is the limit.

Power consumption


We measure power consumption measured in three ways. A white screen, a black screen, and then in standby/power-down mode. We measure at 100% brightness which is the maximum output and thus power consumption.

Idle or sleep power consumption has improved over the years for most technology due to US and EU legislation at 0.1 Watts. Close but no cigar. After the PC is turned off, the power consumption sticks at 20 Watts then drops to 9 watts for about 15 minutes. We’re not sure what it is, but we’re certain that it’s something that needs to be addressed. Please power off your monitor manually by pressing the off button under the monitor after which it will now draw any energy.
Dead pixel check
On inspection, we found no dead or stuck pixels.
Before we overlook it, there are two models. The Asus ROG Swift OLED PG48UQ and PG42UQ appear to be worthy competitors for the title of the biggest gaming monitor. Asus claims both monitors can reach 900 nits of peak brightness due to their unique passive heatsinks. This, along with the ink blacks of their OLED displays, should result in an incredibly dynamic and bright image in low-light settings. Each model is factory calibrated for color accuracy with a Delta E of less than two. A uniform brightness toggle reduces peak brightness for more pleasant viewing when reading web pages or file explorer tabs, for example. Asus ROG describes the PG42UQ and PG48UQ as having a “unique panel sub-pixel arrangement” that should reduce any distracting fringing on text elements. Unlike televisions, the monitors will switch off automatically when you shut down your PC.
What about that OLED burn-in?
Much has been written and debated about OLED burn-in and image preservation. Fortunately, the panel has a few measures that prevent this from happening. ASUS is cooling this monitor with heatsink; the thermal image below shows what is happening there.
We encourage that owners comply to guidelines, such as keeping all of the built-in Screen Protection functions enabled and completing or allowing the display to complete a Pixel Cleaning cycle regularly. If you intend to leave the display powered on for extended periods, ASUS also recommends installing a desktop screen saver. There should be no profound worries about burn-in if these steps are followed. After 8 hours of inactivity, a Pixel Cleaning notification appears for 15 seconds. The warning will appear for 15 seconds every four hours until Pixel Cleaning is complete. If the user turns off the monitor, Pixel Cleaning will begin automatically and take around 6 minutes to complete. If the monitor is turned on before the Pixel Cleaning cycle is finished, it will take a few seconds longer to boot up. Every 4 hours, the Pixel Cleaning notification will be displayed for 15 seconds. The message timer will not be reset until the entire 6-minute cleaning cycle is completed. Yeah, so that’s the compromise you need to make if you pursue an OLED gaming screen.
The Monitor
We received this monitor a week or so ago. You can spot them in retail as of today, closing in at 1500-1600 EUR/USD, which is a lot of money right. Well, let’s unbox.
The ASUS ROG Swift PG42UQ monitor has a design that is very similar to the other ROG monitors in terms of appearance. As a result, this screen will stand out from the masses. ASUS has included a new brightness uniformity feature, which delivers greater constancy in brightness levels. This is a ROG-exclusive feature that helps the PG42UQ stand out from the crowd.
The box’s shell pulls off, exposing the monitor, with construction requiring two people to complete. Four simple screws secure the stand to the back of the display. This is the sole piece of hardware required for this display. Once unpacked you can see a very nice thin OLED screen though; however, backed by heatsinks making it thicker again. The product is carefully packaged. No loose separated power brick this round, just connect your cables.
The PG2UQX is equipped with cooling for the components behind the display panel. All you need to do is mount the stand with four screws, and hook it up.
Included are DP, HDMI, power cable and a manual as well as other small stuff. On the bottom of the screen, there is a useful 5-way navigational joystick for adjusting the settings and OSD, as well as a small and reasonably simple remote control. The screen includes decent 10W speakers as well.
PG42UQ has little circular pads on the pressure points of the stand to aid boost the stability of the panel – ideal for people who don’t have a high-end desk. Moving back, there aren’t many visual features to discuss. A huge ROG logo can be found on the back, along with a number of vents that aid in the operation of the monitor’s innovative heatsink system. To help keep temperatures down, a huge grill has been added at the top of the display. Here we see the monitor on its belly; of course, protective foam is still on the front side. You can spot the ASUS ROG logo, at the bottom side controls, and to the left side connectivity. The power cable connects (weirdly enough to the right). We’ll show you that in more detail on the following pages though.
The screen is matte black, and there is some reflection, the photo does show that due to our all-bright lit testing grounds. Additionally, the ASUS PG42UQ employs a matte anti-glare covering. As a result of the OLED display, ASUS has decided for a glass front instead of the more conventional plastic. However, 42 inches is the proper screen size for this resolution if you talk pixels per inch. We’d say gaming cough versus big screen 🙂
Back to the glare; the ROG PG42UQ’s anti-glare coating effectively scatters incoming light sitting in front of it. When using word processing applications, browsing the web, editing photos, or managing windows, the dynamic brightness feature of OLED displays causes some luminance fluctuations. Due to the APL curve, which is set to approximately 500 nits for 10% and 130 nits for 100%. As we learned, the uniform brightness setting restricts the maximum luminance to 180 nits, so minimizing the effect of brightness modulation. Realistically though, in an office or game room, that fine.
A slight tilt adjustment is offered by the stand. On tilt, you get 5 degrees forward and backward; that’s it. You need to like the RoG styling; of course, that’s not for everybody, while others will love it. Most televisions will turn off if no input signal is present; therefore, when a PC wakes from sleep, the user must manually turn on the display. The ROG PG42UQ is set to standby, allowing for automatic wake-up with the PC.
The backside is not that impressive; design-wise, as mentioned, you’ll get two HDMI 2.1, two HDMI 2.0, one Display port 1.4 port, and a USB hub available for gaming on PC or Mac, the latest consoles, and tethering to other sources.
Asus has included a USB port on the top of the display (covered by that red rubber insert), which is a little surprising initially. However, the idea for this is that when the mounting hole is combined with the display, game streamers can elegantly attach a camera on the top of the display (which is the hole in the middle). In addition to the top-mounted USB port, two additional USB ports are located next to the IO inputs.
Compared to most other monitors, the PG42UQ’s on-screen display (OSD) operates differently. It also differs from prior ROG monitors, which had a set of buttons on the right back of the screen. Now a joystick knob and two buttons remain located at the bottom side.
The PG42UQ has a pretty wide stretching joystick knob in the center of the screen, which allows you to scroll through the menu swiftly. It is accompanied by two buttons for ‘power on/off and ‘OK,’ which allow you to exit the menu fast. It works really well.
We’ve already stated enough about the connectors, but 2x HDMI 2.0, 2x HDMO 2.1 and 1x DP 1.4 alongside USB connectivity is what you will receive. Display Stream Compression (also known as DSC) is supported by the DisplayPort connection, which means we can achieve full 4K 120 of OCed higher 138 Hz RGB support without chroma subsampling. A significant issue with the first generation of 4K 144Hz displays, although it has since been fixed. With the PG42UQ, you can get 8-bit+FRC at 4K 144Hz or native 10-bit at up to 4K 120Hz on a single channel. On Overclocking, both the PG42UQ and PG48UQ can be overclocked to 138 Hz and enable DSC for image quality (your graphics card needs to support DCS, though).
-
REAR I/O: 2 x HDMI 2.1, 1 x DP1.4, AND USB 3.0 I/O PORTS
-
SIDE I/O: 2 X HDMI 2.0, 3.5MM HEADPHONE OUTPUT
-
TOP: USB 3.0 PORT FOR WEBCAMS AND PERIPHERALS
Because most televisions turn off when no input signal is present, the user must manually turn on the display when a PC wakes from sleep. The ROG PG42UQ is set to standby mode, allowing for automated wake-up with the PC.
The On-Screen Display
A couple of photographs illustrating this monitor’s on-screen display and functioning are included below. The PG42UQ knob beneath the screen allows you to browse through the menus quickly. Two buttons on either side of this knob correspond to ‘Back’ and ‘OK.’ The menu’s usability is decent since you can easily browse through it, and everything is properly defined. The OSD is activated by clicking the joystick once and then moving left or right. A crosshair, framerate counter, and timer are among the tools available. That’s next to all preferences, of course.
Color space and screen uniformity
We start our tests by measuring color space and screen uniformity. Uncalibrated performance means the out-of-the-box settings a monitor ships with. Calibrated performance is what results after the monitor has been put through our DataColor Spyder calibration process. Our aim with calibration is to be at a Gamma of 2.2 with a target 6500k color temperature and an aim of 120cd/m2 brightness. Luminance is candelas per square meter (cd/m2), also described as ‘nits’. By default, the screen is setup in Racing mode where it matches a perfect 00% of the sRGB colorspace and 88% of Adobe RGB (close to DCI-P3).
The sRGB range is fully covered; however Adobe RGB (close to DCI-P3), is nowhere near advertised values.
Gamma
These monitors come factory calibrated for you; we aim for a gamma of 2.2, which is also the default for the ASUS configuration.
Gamma deviation uncalibrated was close at 2.3; there is an allowance deviation of 10%, so that is still fine. This is the monitor untouched out of the box aside from a rest back to firmware defaults. Of course, you can alter and tweak anything to your liking as the monitor has selectable gamma modes.
ASUS promises a color-accurate delta <2.0 or better. From a practical perspective, the average human eye cannot detect any color differences with a Delta-E value of 3 or less. An exceptionally trained and sensitive human eye will only be able to perceive color differences with a Delta-E of 1 or above. The monitor is excellent at an △E<1 average.
Panel color uniformity
The thesis behind screen uniformity is how the image is distributed across the screen. A uniform screen displays an image that remains consistent in terms of clarity, color, and brightness at all points across the display area. We test at 50% and 67% brightness levels.
Above, the screen color uniformity (the same colors measured at nine different parts of the screen). This is an attractive result.
Panel Luminance uniformity
A screen can be a non-uniform screen. On an all-white background, such a screen has a somewhat dirty appearance, with things like banding visible. However, as bad as this sounds it may not noticeably affect the image when looking at colored content like your desktop and/or gaming.
Panel luminance or brightness uniformity tells us how well the screen is lit up by the LEDs and where it is brighter compared to other spots. We measure at nine hotspots on the screen, with slightly varying results. Things are very consistent despite what you might think about the percentage values. For any result in this chapter, a value of under 20% is not noticeable to the untrained eye. Excellent results, albeit with OLED, we expected margins to be even smaller as the lower right side of the panel is deviating slightly.
Contrast ratio
Here, we undertake a simple contrast test that is both tough and realistic. The contrast ratio is the ratio of light coming from the screen when it is supposed to display bright white to light coming from the screen when it is supposed to display pure black. Overall, contrast ratios on LCD panels range from about a dismal 150:1 to a very good 800:1 or even greater.
For everyday tasks such as photo editing and Office, a contrast ratio of 400:1 or more is considered adequate. The problem is that even if you watch a movie on such a monitor in a dim location, you will realize that ‘black is not truly black.’ Laptop monitors are an excellent example (though much better these days), as they frequently have low contrast ratios (150:1 when viewed straight-on and below 80:1 at relatively small angles). A set of test photos with black and white luminance values are used to perform the measurement.
OLED black levels are unmeasurable( the pixel is deactivated) by any currently accessible tools; their contrast is mathematically infinite. The next best option is a VA monitor, but they pale in contrast to OLED. It doesn’t get any better than this.
The contrast ratio is a property of a display system, defined as the ratio of the luminance of the brightest color (white) to that of the darkest color (black) that the system can produce. A high contrast ratio is a desired aspect of any display. The static contrast ratio is limited by the panel technology being used. A TN or IPS technology panel is limited by a contrast ratio of around 900 – 1200:1, and on a VA type panel you might reach up to around 2000 to even 3000:1. We could not measure a whole black field in this OLED as planned because it is just too dark for our meter to register.
Maximum brightness
To see how well a monitor behaves in heavily lit areas with a lot of sunlight, we look at maximum brightness in white. You can measure the output quite easily. Overall the screen shows a proper and decent brightness level close to the advertised brightness level range.
Before you go WTF, here’s what is happening. SDR is rated advertised at 450 cd/m2 (typical). When using word processing apps, perusing the web, editing photographs, or manipulating windows, the dynamic brightness feature of OLED panels causes perceptible luminance fluctuations. The APL curve is set to 500 nits for 10% and 130 nits for 100%. Uniform Brightness setting restricts the peak luminance to 180 nits, reducing the impact of brightness modulation.
An OLED monitor is not for you if you seek maximum brightness. Despite advancements, a premium LCD will be significantly brighter. Most LCD-based HDR displays have a maximum brightness of 400 nits. The brightness was uniform from edge to edge. There was no bleed, glow, or vignetting, which can be seen as darker corners.
Viewing Angle & Color Temperature Offset
Monitors are often advertised as having a viewing angle of somewhere between 140 and 165 degrees. This means that you can still see what’s on the display if you are looking at it at 70 to 83 degrees from the side. However, most of the time, you will be sitting roughly straight in front of the screen, which means that you are looking at 0 degrees to the center of the screen and, at most, 45 degrees to the sides. Compared to the advertised viewing angle, it is much more relevant that the display does not change brightness or color in the corners. Above, a 0% view angle, we look directly at the screen. Below, the viewing angle at sharper horizontally positioned camera angles. At an angle of almost 40 degrees here’s where TN panels normally run into issues, IPS and VA are way better in this respect.
Photos absolutely blow to show the effect properly, when you look at brightness and discoloration alongside the viewing angle then that will tell you something about the image quality when you are not looking straight at the screen. TN screens would show discoloration to some degree whereas IPS and VA screens are less sensitive to that. Viewing angles for monitors are relative and a fairly subjective thing, as I assume, you’ll be sitting directly in front of your monitor. Our overall subjective rating; very good.
These images emphasize two points. OLED panels have greater off-axis image quality than LCD displays, although they are not flawless. A minor green shift can be seen at 45 degrees to the sides and from above. However, light output remains very constant, and detail remains consistent. We scarcely noticed anything when we moved off center in the material. Another thing visible here is more minor reflections. For the best image, placement should be carefully examined. Any bright light source, such as the sun or a lamp, will be detected. The light does not wash out the image, but the reflections do.
Color temp target 6500K
We approach color precision in a simple understanding way, and to explain the method, this test is simple. We look at how close the screen is to a color temperature of 6500 Kelvin based on the default color space. This test is done at default monitor settings. The screen, however, has many presets you can choose from and some very specific RGB color control preferences. The sky is the limit.
Power consumption
We measure power consumption measured in three ways. A white screen, a black screen, and then in standby/power-down mode. We measure at 100% brightness which is the maximum output and thus power consumption.
Idle or sleep power consumption has improved over the years for most technology due to US and EU legislation at 0.1 Watts. Close but no cigar. After the PC is turned off, the power consumption sticks at 20 Watts then drops to 9 watts for about 15 minutes. We’re not sure what it is, but we’re certain that it’s something that needs to be addressed. Please power off your monitor manually by pressing the off button under the monitor after which it will now draw any energy.
Dead pixel check
On inspection, we found no dead or stuck pixels.